Tutorial: Extended Depth of Field
This is an example of how to use mahotas to implement an algorithm that it does not have built-in: extended depth of field.
The idea is that you have a stack of images, taken at different focal points, and you build a single image so that you get everything in focus.
Start with standard imports:
import numpy as np
import mahotas as mh
We are going to assume that you have an image object, which has three
dimensions: the stack, height, and width:
stack,h,w = image.shape
We use mh.sobel as the measure of “infocusness” for each pixel [1]:
focus = np.array([mh.sobel(t, just_filter=True) for t in image])
Now, we select the best slice at each pixel location:
best = np.argmax(focus, 0)
So far, very easy. The next part is the hard part. We want to do the following:
r = np.zeros((h,w))-1
for y in range(h):
    for x in range(w):
        r[y,x] = image[best[y,x], y, x]
But this is very slow (never run nested loops in Python if you can avoid it). We get the same result with a slightly less legible, but faster manipulation [2]:
image = image.reshape((stack,-1)) # image is now (stack, nr_pixels)
image = image.transpose() # image is now (nr_pixels, stack)
r = image[np.arange(len(image)), best.ravel()] # Select the right pixel at each location
r = r.reshape((h,w)) # reshape to get final result
Et voilà!
Here is an example, from a stack of microbes imaged. This is is the maximum intensity projection:
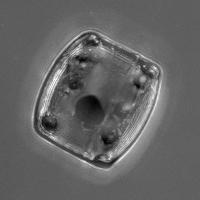
This is the most in-focus slice (using the sobel operator as the measure):

And this is the extended depth of field result:
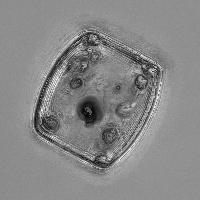
It is clearly sharper, perhaps at the expense of some possible noise. I actually played around with blurring the image a little bit and it did improve things ever so slightly.